

Database Update Procedure
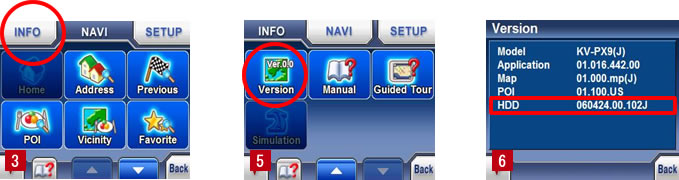
1. How to check the KV-PX9痴 HDD version.
- 1) Turn ON the unit.
- 2) Tap MENU button on the map screen.
- 3) Tap INFO button.
- 4) Tap Page Down key.
- 5) Tap Version button.
- 6) HDD version is displayed. If the version is 060424.00.102J, your KV-PX9 needs to be updated.
2. PC System Requirements
- Hardware: IBM PC/AT compatible
- OS: Windowsョ XP / Windowsョ 2000
- Memory: 256MB or more
- HDD free space: 300MB or more
- Other: USB port (USB2.0), mini-USB cable
Notes:
- It should be operated with power supplied from the AC adapter or using the battery with at least 80% remaining charge.
- When installing the HDD update tool, you must log on to the PC as an administrator (or be logged-on with administrative privileges). Also, the Standby mode or Hibernation mode should be cancelled.
3. Download and Update
- 1) It is recommended that there are no other programs or screen saver running on your PC during the update process.
- 2) Click 泥ownload・and save the file to your PC.
- 3) Double-click the downloaded file “px9updateHdd103_001.exe”.
*If 鉄ecurity Warning・is displayed, click 燃un・ - 4) When 滴DD Update Tool for KV-PX9・is activated, click "Next".

- 5) If it is okay to install the updater in the displayed destination, click "Next".
- 6) Click "Next" to execute.

- 7) Connect the KV-PX9 and your PC with the USB cable.
(Do not use a USB Hub. DO NOT disconnect the USB cable before updating is completed.) - 8) Usage Agreement screen appears. Click 鄭gree・if you agree with it.
- 9) Confirm the KV-PX9 is securely connected to the PC.
- 10) Confirm the version shown is 0.102J.
- 11) Click 填pdate・ button.
- 12) Confirmation screen appears. Click 添es・to confirm it.
- 13) Update starts. Please wait about 6 minutes during updating.
- 14) When updating is complete, the message 填pdating process was completed.・appears. Click 摘xit・to end.
- 15) Disconnect all cables from the KV-PX9.
- 16) Delete the downloaded file 菟x9updateHdd103_001.exe・on your PC. Other related files created during the update process will be automatically deleted.