
Firmware Download for GC-XA1
Preparation
GC-XA1, supplied battery pack, supplied USB cable, PC, formatted SD card by GC-XA1
*To secure power supply during update, use the optional AC adapter(AC-V10L) or full charged battery.
Firmware update
1.Prepare the formatted SD card by GC-XA1.
2.Download the update file and extract it.
3.Copy all the files in the folder that was created to the root directory of the SD card.
* Do not copy the whole folder.
4.Insert the SD card to the GC-XA1.
5.Turn on the GC-XA1.
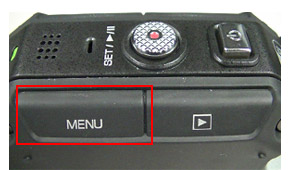
6.Press the [MENU] Button.
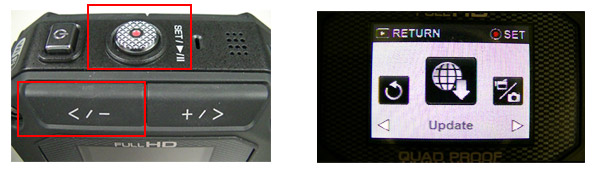
7.Select the 'update' by pressing the [</-] button and press the [SET] Button.
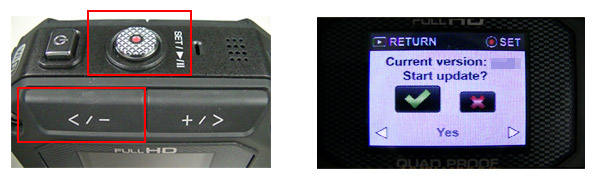
8.Select 'Yes' by pressing the [</-] button and press the [SET] Button.
9.Start the update.(about 2min.)

10.Once the camera auto power off, it mean the update is complete.
Install instruction data
11.Turn on the GC-XA1 again.
12.Press the [MENU] Button.
13.Select the 'update' by pressing the [</-] button and press the [SET] Button.
14.Select 'Yes' by pressing the [</-] button and press the [SET] Button.
15.Start the update.(about 2 to 3 min.)
16.Once the camera auto power off, it mean the update is complete.
17.Press the [MENU] Button.
18. Select the 'Default Setting' by pressing the [</-] button and press the [SET] Button.

19.Select 'Yes' by pressing the [</-] button and press the [SET] Button.

20.Turn off the GC-XA1 by pressing the [power button] for about two seconds.
21.Update complete